AI pair programming with IBM Bob
Use Bob as an AI pair-programming assistant to build a FastAPI To-Do API, working from requirements to a plan, generated code, tests, and documentation.
With AI pair programming, you build software alongside an assistant that helps at every stage of planning, coding, testing, and documenting, rather than one that only autocompletes lines. In this tutorial, you pair with IBM Bob to build a FastAPI To-Do API from a set of requirements.
You start from the requirements and move through a reviewed plan, generated code, an explanation of the implementation, code-quality improvements, unit tests, and technical documentation. The data store is an in-memory Python list, so there is no database to set up.
By the end, you have a working containerized To-Do API and have practiced the pair-programming review loop at each stage: plan, generate, explain, refactor, test, and document.
This tutorial is for developers who know basic Python and REST concepts and want a repeatable review loop for building software with an AI assistant. No FastAPI experience is required.
This tutorial covers the full build loop end to end on a new project. To go deeper on planning and implementing a large feature inside an existing codebase, see Plan and implement complex features.
Prerequisites
To complete this tutorial, you need the following:
- Bob IDE installed and configured.
- Familiarity with Use literate coding to generate code from comments.
- Completion of Create a new context window, so you can manage Bob's context across this multi-step workflow.
- Docker installed and running on your workstation. Bob generates a Dockerfile so you can build and run the API in a container without installing Python or its dependencies locally.
- Basic Python knowledge.
- Basic understanding of REST APIs. You do not need prior FastAPI experience. Bob generates the FastAPI code and explains it on request as part of the workflow.
Understand AI pair programming with Bob
Each stage that follows covers planning, generation, explanation, refactoring, tests, and documentation. In every stage, Bob proposes changes and you approve, reject, or revise them before Bob applies them.
Pair programming workflow
This tutorial uses the following workflow:
Requirements
  ↓
Bob creates a plan
  ↓
You review and refine the plan
  ↓
Bob generates code
  ↓
You review the output
  ↓
Run and validate
  ↓
Bob explains the implementation
  ↓
Bob suggests code-quality improvements
  ↓
Generate tests
  ↓
Generate documentation
Set up your workspace
Launch Bob, open an empty project folder, and configure Bob to ask for approval before it changes files.
Launch IBM Bob
Launch the IBM Bob IDE.
Open the Bob chat interface
If the Bob chat interface is not visible, open it by selecting the Bob icon beside the navigation bar. You can also press Option + Command + B on Mac, or Ctrl + Alt + B on Windows and Linux.

Open an empty project folder
Create an empty folder named todo-api, then open it in Bob with File > Open Folder. If Bob asks whether you trust the authors of the files in the folder, select Yes, I trust the authors.
Bob writes the generated application into this folder. You do not need an existing repository for this tutorial.
Disable auto-approval
Open Permissions and confirm that auto-approval is turned off. With auto-approval off, Bob asks for your permission before it reads files, edits files, or runs commands. You stay in control of every change in this tutorial.
Define the requirements and plan
Give Bob the requirements for the To-Do API, then review the plan it proposes before Bob writes any code.
Switch to Plan mode
Open the mode dropdown at the bottom of the Bob sidebar and select Plan.
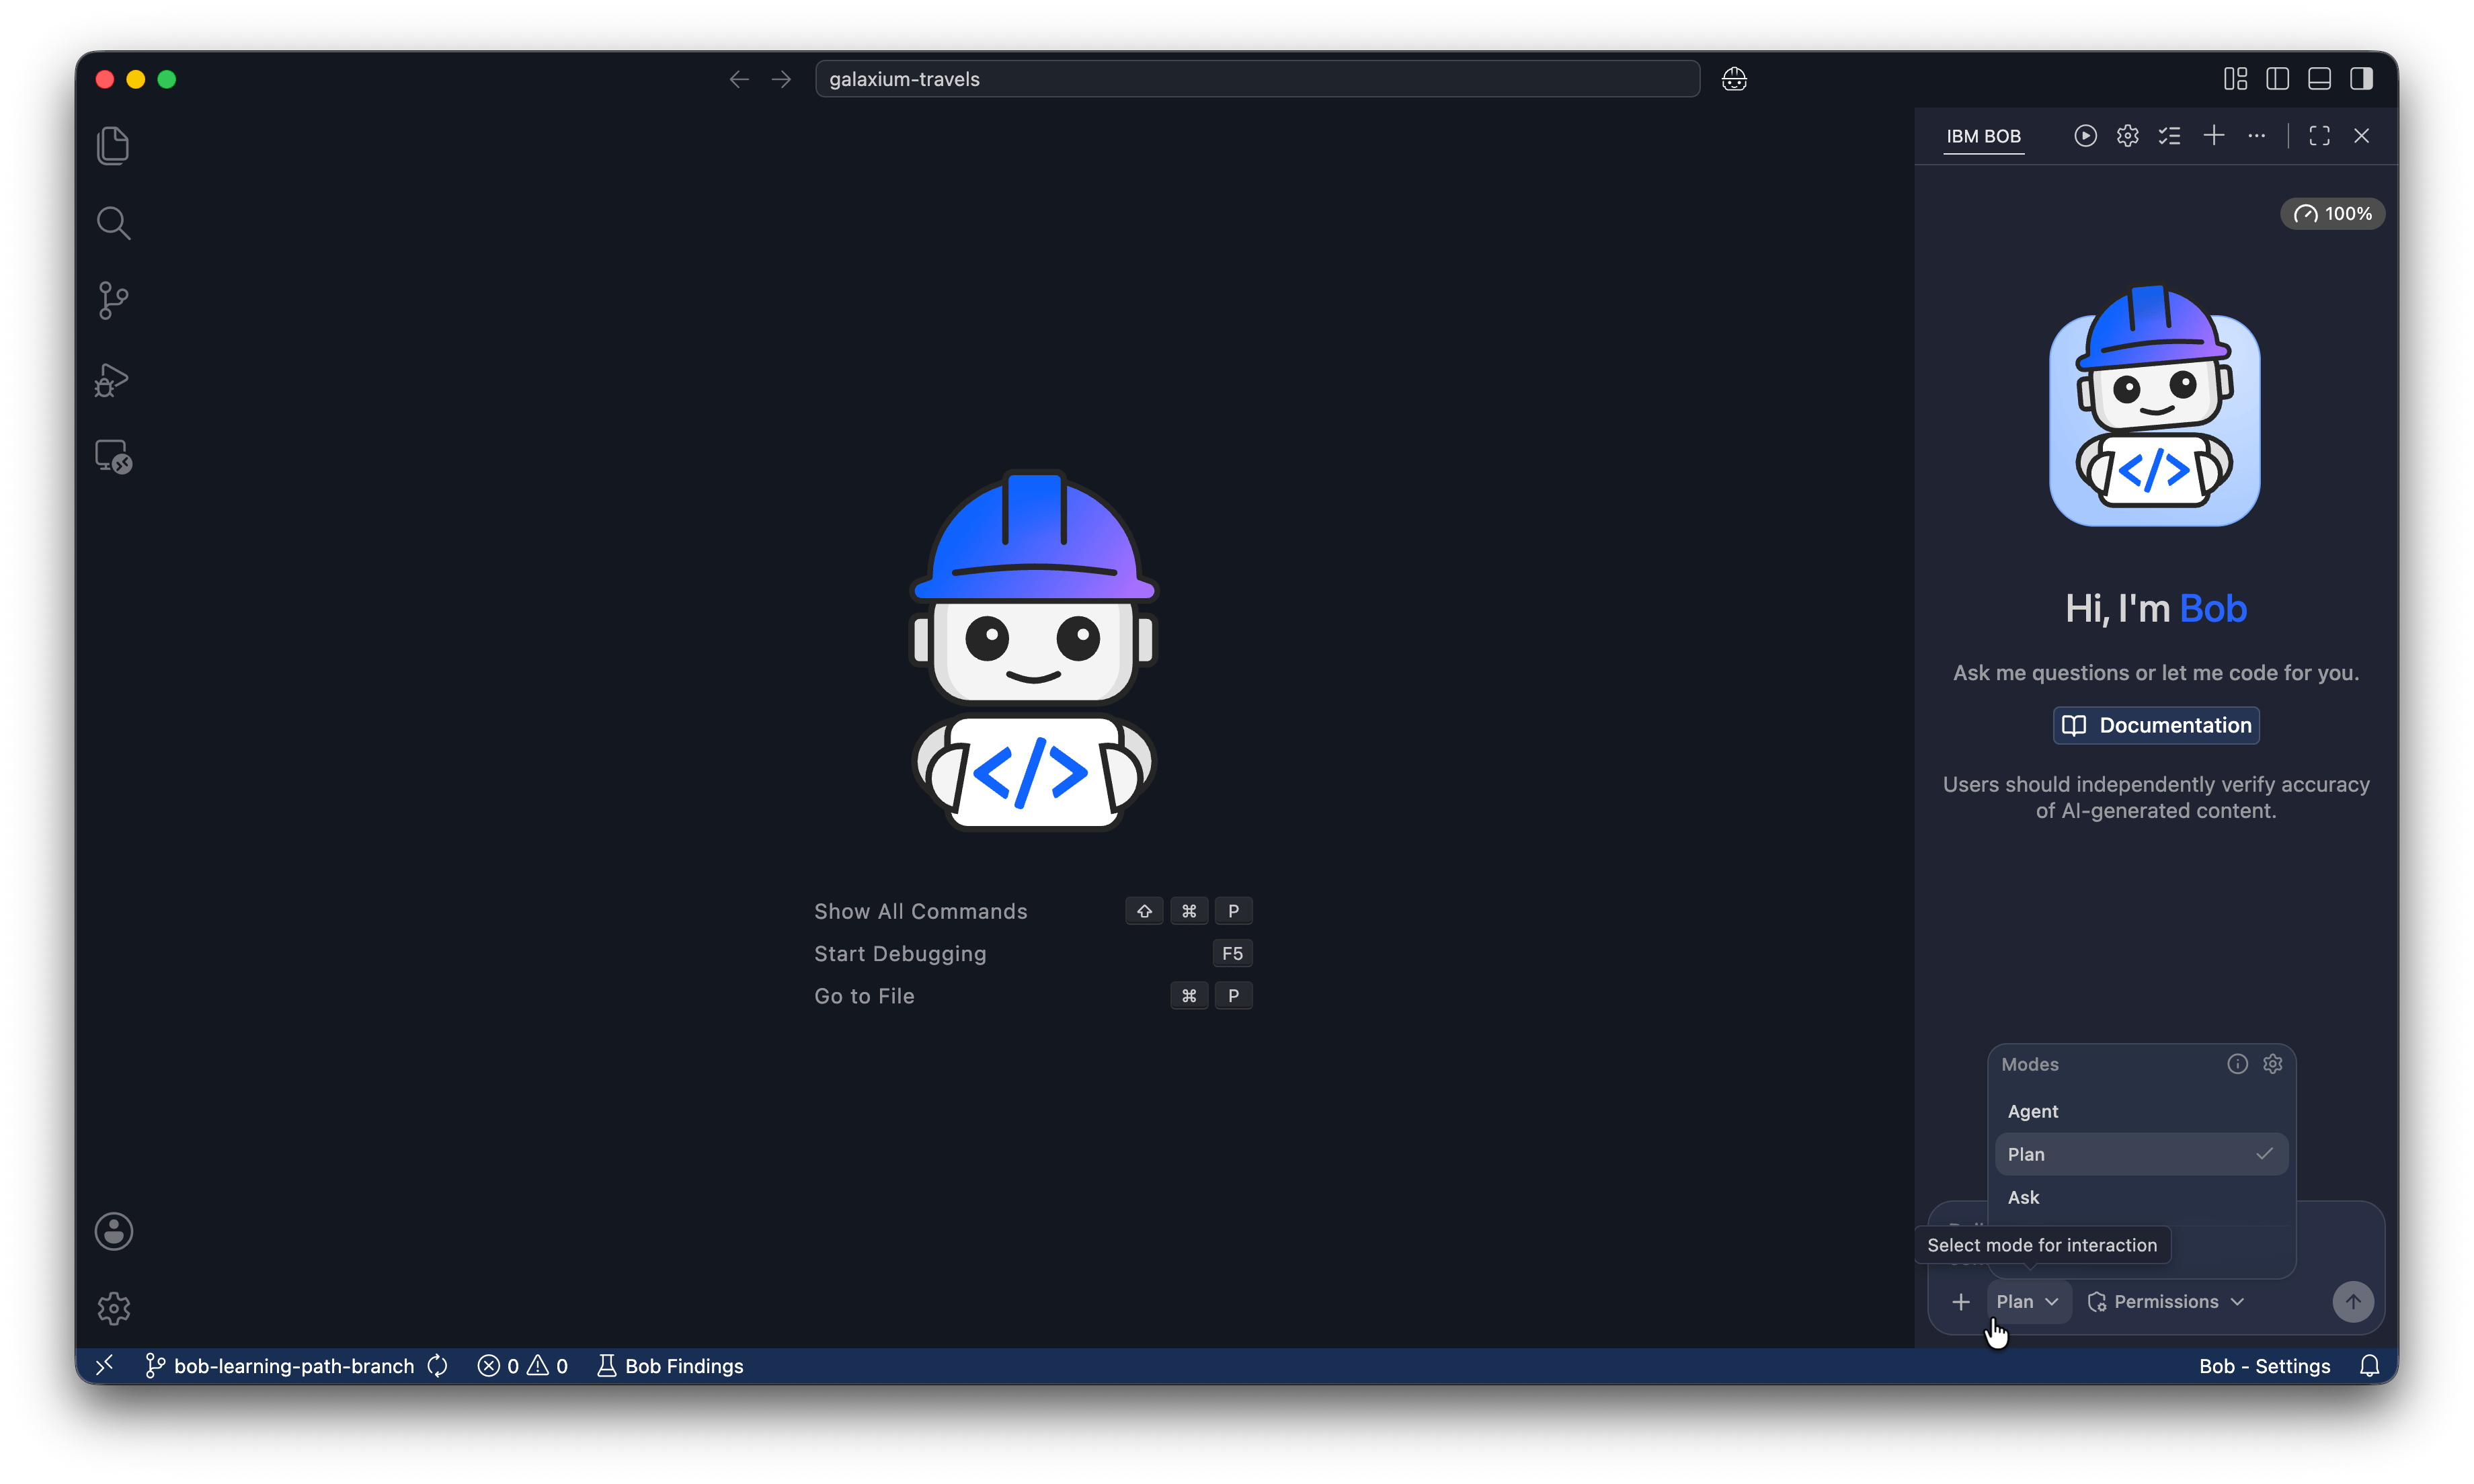
Modes apply the principle of least privilege. In Plan mode, Bob reads your code and writes a Markdown plan. Bob does not run commands or make implementation changes. You review the approach before Bob writes any application code.
Define the application requirements
In the Bob chat interface, enter the following prompt:
Create a simple FastAPI To-Do API.

Requirements:

- Store tasks in a Python list.
- Each task should contain:
    - id
    - task_name

Implement these endpoints with explicit HTTP status codes:

- GET /tasks: list all tasks. Return 200.
- POST /tasks: create a task from a JSON body containing only task_name. Return 201 with the created task.
- DELETE /tasks/{task_id}: delete a task. Return 204 on success and 404 if no task has that id.

Use FastAPI and Pydantic. Use Pydantic model validation so an invalid request body returns 422.

Include a requirements.txt and a Dockerfile. The Dockerfile must start Uvicorn bound to 0.0.0.0 on port 8000 so the API is reachable through a published container port.

Save the plan as Markdown files in a folder named `plans`.

Put the FastAPI application in a single file named `main.py` at the project root.

Keep the implementation simple.

Don't install any dependencies locally or run local tests. Everything will run in a Docker container.
To build the plan, Bob runs its planning skill. When prompted, select Approve skill tools for task and Approve subagent tools for task so Bob can research the workspace and draft the plan.
Refine the plan
You can change the plan before Bob writes any code. In the Bob chat interface, enter a follow-up prompt:
Update the plan to reject a task whose task_name is empty or longer than 200 characters.Bob revises the plan to include the extra input validation. Review the updated plan.
Review the plan
Bob presents an ordered plan and may save it as a Markdown file in the project. Review it before you continue:
- Scope: the plan covers every endpoint and the validation rule you added, and nothing you did not ask for.
- Named files: each step names the file it creates or changes.
- Vague language: phrases like "handle errors appropriately" hide assumptions. Ask Bob to make them specific.
You stay responsible for these design decisions. Bob does not implement anything until you switch to Agent mode in Generate and review the application.
Generate and review the application
Start a fresh context window, switch to Agent mode, and have Bob implement the approved plan.
Start a new context window
Select New task in the chat box or + at the top of the chat panel to start a fresh context window. Refer to Create a new context window for background. Bob saved the plan in the plans folder, so you no longer need the planning conversation in context. A clean context keeps the implementation focused on the approved plan.
Switch to Agent mode and run the plan
Open the mode dropdown at the bottom of the Bob sidebar and select Agent. Then tell Bob to implement the plan:
Implement the plan in the plans folder.
@plans/
Agent mode lets Bob write files and run commands. Bob asks for approval before each change because you disabled auto-approval. Approve the steps as Bob works through the plan.
Review the generated application
When the implementation is complete, review the generated code. Because Bob's output is probabilistic, your code style and internal names may differ from the examples shown here. The application consists of the following parts.
Data models. Bob generates two Pydantic models: one for the request body when creating a task, and one for a stored task. The create model enforces the length rule you added during planning:
class TaskCreate(BaseModel):
    task_name: Annotated[str, Field(min_length=1, max_length=200)]


class Task(BaseModel):
    id: int
    task_name: str
The endpoint paths and status codes match the requirements you gave Bob, but model class names and file layout can vary. This tutorial assumes the models Task and TaskCreate. Adjust the prompts that follow if Bob chose different names.
In-memory data store. Bob stores tasks in an empty Python list and assigns each new task an incrementing id:
tasks: list[dict] = []
id_counter = 0
API operations. The application provides the following endpoints:
GET /tasksPOST /tasksDELETE /tasks/{task_id}
POST /tasks takes only task_name in the request body and returns 201 with the created task. DELETE /tasks/{task_id} returns 204 on success and 404 when no task has that task_id.
Dependencies. Bob generates a requirements.txt file that lists FastAPI, Uvicorn, and Pydantic.
Container. Bob generates a Dockerfile that installs the dependencies and runs the API on port 8000 with Uvicorn.
The HTTP contract follows the requirements prompt, including methods, paths, and status codes. The following validation steps apply as written.
Add an endpoint with literate coding
Use literate coding mode to add an update endpoint directly from a natural-language instruction in the editor, without switching to the chat window.
Literate coding mode generates code from natural-language instructions written directly in the editor.
Open the application file
Open the main.py file that Bob generated and place your cursor on an empty line at the end of the file, after the last route handler.
Activate literate coding mode
Press Command + I on Mac, or Ctrl + I on Windows and Linux. You can also select the magic wand icon in the editor toolbar.
Write the instruction
Enter the following instruction on the empty line. It appears highlighted in a different color from the rest of the code.
Add a PUT /tasks/{task_id} endpoint that updates the task_name of an existing task, matching the style and conventions of the existing routes. Return 200 with the updated task, or 404 if no task has that id.Bob infers the parameter name, request model, and error handling from the surrounding code, so you only specify the method and path.
Generate and accept the code
Select Generate, or press Command + Enter on Mac, or Ctrl + Enter on Windows and Linux. Bob replaces your instruction with an implementation and shows an inline diff.
Review the diff, then select Accept All to apply the change. Press Command + I on Mac, or Ctrl + I on Windows and Linux again to leave literate coding mode.
Explain, run, and validate
Ask Bob to explain the implementation, then run the application and validate its behavior.
Ask Bob to explain the code
Start a new context window with New task, then select Ask from the mode dropdown. Ask mode answers questions and analyzes code without editing files. Use it when you want an explanation without changes.
Understanding generated code is an important part of AI pair programming. Ask Bob:
Explain the generated To-Do API.Bob can explain the application architecture, data flow, FastAPI components, Pydantic models, endpoint behavior, and design decisions. Use the explanation to confirm the code does what you expect before you change or extend it.
Run the application
Switch back to Agent mode so Bob can run commands. Ask Bob to build and run the API in a container:
Build the Docker image and run the container with port 8000 mapped to the host. Confirm the API is reachable.Bob runs the build and start commands and reports when the container is running.
Open http://localhost:8000/docs in your browser.
FastAPI serves an interactive Swagger UI at /docs. Use it to explore each endpoint, inspect request and response schemas, and run API calls from the browser.
Validate the API
Use the Swagger UI at /docs to exercise each operation. For every endpoint:
- Expand its row and select Try it out.
- Enter any path parameters or request body.
- Select Execute.
- Check the Server response code and body.
Add a task
-
Expand POST /tasks and select Try it out.
-
Replace the request body with:
{ "task_name": "My first API item!" } -
Select Execute. Confirm the response code is
201and the response body shows the created task with an assignedid.
Retrieve tasks
- Expand GET /tasks and select Try it out.
- Select Execute. Confirm the response code is
200and the response body lists the taskMy first API item!with theidassigned when you added it.
Update a task
-
Expand
PUT /tasks/{task_id}and select Try it out. -
Enter the
task_idof the task you created. -
Replace the request body with:
{ "task_name": "Build and ship a To-Do API" } -
Select Execute. Confirm the response code is
200and the returned task shows the updatedtask_name. -
Change
task_idto a value that does not exist and select Execute again. Confirm the response code is404.
Delete a task
- Expand
DELETE /tasks/{task_id}and select Try it out. - Enter the
task_idof the task you created and select Execute. Confirm the response code is204. - Expand GET /tasks, select Execute, and confirm the task no longer appears in the response.
- Expand
DELETE /tasks/{task_id}again, enter the sametask_id, and select Execute. Confirm the response code is404.
The implementation meets the original requirements, including the update endpoint you added with literate coding.
Improve code quality
Ask Bob to review the generated code for quality issues, then apply the changes you agree with. This step uses Bob as a reviewer rather than only a code generator.
Ask Bob for improvement suggestions
Start a new context window with New task, then enter:
Review the To-Do API and suggest improvements to code quality, error handling, and HTTP status codes.Bob identifies gaps such as a missing endpoint to retrieve a single task, an in-memory store that holds plain dictionaries instead of validated Task models, and a module-level id_counter that is hard to reset or test.
Apply the improvements
Ask Bob to implement the suggestions you want to keep:
Add a GET /tasks/{task_id} endpoint that returns 404 when the task ID does not exist, and store tasks as Task models instead of dictionaries.Review the proposed changes and approve to apply them. Ask Bob to rebuild the image and restart the container, then repeat the validation steps. Confirm that GET /tasks/{task_id} returns 200 with the task for a valid ID and 404 for an unknown ID, and that the existing endpoints still behave as before.
Generate tests and documentation
Ask Bob to generate a test suite and technical documentation for the API.
Generate unit tests
Start a new context window with New task, then ask Bob:
Generate pytest unit tests for this application. Add pytest and httpx to a dev requirements file, build a test image, and run the suite in a container.Bob adds the pytest and httpx test dependencies, builds an image that includes them, runs the suite in a container, and reports the results. Running the tests in a container means you do not need a local Python environment. Review and refine the generated tests.
Reviewing and maintaining generated tests remains your responsibility.
Generate technical documentation
Ask Bob:
Generate technical documentation for this To-Do API.Bob can generate an application overview, architecture description, endpoint summaries, request and response examples, and usage instructions. This documentation complements the API documentation that FastAPI generates automatically.
Troubleshooting
Use the following solutions for common problems:
- Cannot connect to the Docker daemon: Start Docker Desktop or the Docker service before you build the image.
- The container starts but
http://localhost:8000/docsdoes not load: The Dockerfile binds the API to127.0.0.1inside the container, which the published port cannot reach. Make sure the Dockerfile starts Uvicorn with--host 0.0.0.0, then rebuild the image. - Bind for 0.0.0.0:8000 failed: port is already allocated: Stop the process using port
8000, or map another host port withdocker run -d --name todo-api -p 8080:8000 todo-apiand openhttp://localhost:8080/docs. - The container name "/todo-api" is already in use: Run
docker rm -f todo-api, then start the container again. - pytest is missing when the tests run: The application image does not include test dependencies. Ask Bob to add
pytestandhttpxto a dev requirements file and build a separate test image.
Clean up
Stop and remove the container to release port 8000:
Stop and remove the To-Do API and test container and image.The API keeps tasks only in memory, so removing the container discards all data. There is nothing else to clean up.
Next steps
In this tutorial, you built and validated a containerized FastAPI To-Do API by pairing with Bob at every stage and reviewing each change before applying it.
- Advance to Plan and implement complex features to scope larger, multi-layer changes.
- Explore Create a commit and pull request to take generated code from your editor to a pull request.
FAQ
Do I need to know FastAPI? No. Bob generates the FastAPI and Pydantic code and explains it on request. Basic Python and REST knowledge is enough.
Why switch modes between stages? Modes apply least privilege. Plan mode reads code and writes a plan but runs nothing; Agent mode can edit files and run commands; Ask mode answers questions without changing files. Switching keeps Bob's capabilities matched to the task in front of you.
What if Bob names files or models differently?
The HTTP contract is pinned by the requirements prompt, so paths and status codes match. Class names and file layout can vary. This tutorial assumes the models Task and TaskCreate; adjust later prompts if Bob chose other names.
Why start a new context window at each stage?
Bob saves the plan to the plans folder, so earlier conversation is no longer needed in context. A clean context keeps each stage focused and controls token cost.
Can I do this without Docker? You can technically do this tutorial without Docker, but you will need to edit the plan and prompts to Bob.
Does Plan mode change files? No. In Plan mode Bob reads your code and writes a Markdown plan only. No application code changes until you switch to Agent mode.
Use literate coding to generate code from comments
Use literate coding to have Bob generate code from natural language comments. Bob helps you write precise, context-aware code modifications directly in your editor.
Modernize a Node.js application
Learn to use IBM Bob for application modernization by upgrading a Node.js Express API from version 16 to 22. Try AI-assisted development with modes, approvals, and literate coding in this hands-on tutorial.